From setup to compliance: self hosting at home a mail server
In this container-dominated era, setting up a software solution for a self-hosted mail server has become surprisingly straightforward, even for those with limited technical expertise. The use of modern pre-built software packaged with container technology has transformed what was once a complex undertaking into a manageable project. This post aims to unveil the simplicity behind self-hosting your email, a powerful step towards greater digital independence and privacy.
By self-hosting your mail server, you take a critical step towards safeguarding your digital communications. However, it's not just about the setup; it's also about ensuring your emails reach their destination without being flagged as spam. We will explore the essential aspects of compliance and my practices to maintain a reliable and respected presence in the world of email communication.
The introduction of container technology has significantly simplified the process of self-hosting mail servers. By encapsulating applications and their dependencies into a single, configurable unit, these containerized solutions allow for easy deployment and customization through environment variables, bypassing the complexities inherent in traditional setups.
Among the popular containerized self-hosted mail solutions are:
Mailcow: A user-friendly Dockerized mail server solution, Mailcow comes with a web-based UI for easy management, integrating components like SOGo for webmail and CalDAV/CardDAV for calendar and contacts support.
iRedMail: Available in both traditional and Docker versions, iRedMail simplifies deployment with its containerized version, offering a robust set of features including webmail and spam/virus scanning.
Poste.io: This Dockerized solution provides a full-featured mail server stack complete with a web administration interface and support for standard mail protocols.
These containerized mail server solutions represent a significant advancement in making self-hosting accessible and manageable, allowing more individuals and organizations to exercise greater control over their digital communications.
I'll focus on Mailcow for its ease of use, integrated web UI, and its inclusive suite of email services.
Setting up mailcow
To use Mailcow docker and the compose tool (either the standalone docker-compose or the docker compose plugin) are required, be sure to have installed on your system. I'll use the compose plugin with docker 24.0.7.
Be sure to do all the following steps as root and check that your umask equals to 0022.
$ su
# umask
0022 # <- Verify it is 0022
# cd /opt
# git clone https://github.com/mailcow/mailcow-dockerized
# cd mailcow-dockerized
Generate the configuration file and use a FQDN when asked and then edit it according to your needs:
./generate_config.sh
nano mailcow.conf
Now, simply pull the images and spin up the containers.
docker compose pull
docker compose up -d
And that's it! Simple as drinking a cup of tea. For further documentation or troubleshooting check on the official docs.
Once done you have to set up your DNS records. Let's say that you domain is mydomain.com and the FQDN of your server is mail.mydomain.com, you'll have to set the following records:
| TYPE | HOST | ANSWER |
|---|---|---|
| MX | mydomain.com | mail.mydomain.com |
| A | mail.mydomain.com | [the server ip address] |
and now you can receive and send email messages from your new server.
Compliance (aka not being marked as spam)
That was actually the easy part, now the real fun begins. Let's say that you want to self host your email server at home, maybe on a spare computer laying around in your house collecting dust, you'll first have to set up the correct port forwarding in your router to route incoming SMTP(S)/POP(S)/IMAP(S) connections to your server, and that's pretty straightforward if you have ever experienced with port forwarding.
Time to test, so you create a mail inbox in mailcow and send an email to your newly created email from another email of your choice (e.g. protonmail or gmail) and yay! 🎉 you can successfully receive emails. Let's test the other way by sending an email and chances are that you'll be marked as spam. 😧
There are some security issues here that cause your outbound email to be marked as spam, which we'll examine in detail further below:
- Dynamic public IPs
- IPs with the wrong reverse DNS
- Domains with unset or wrong DMARC
Dynamic public IPs
We know that when we connect to the internet the ISP assigns us a public IP address to be public available on the net and, since we usually don't need to be addressable because the standard user do not expose any service, there's no real need to assign a static IP to every ISP customer, hence a temporary one is assigned every time a home router is booted. This allows ISP to reuse the same IP address in different times for different customers but this means that you'll have to update your DNS; you still could use dynamic DNS solutions like dynDNS or no-ip, but that brings us to the second issue.
IPs with the wrong reverse DNS
The reverse DNS is, as the name says, the opposite of a DNS record: it associates a domain name to a specific IP address, and is critical for validating the legitimacy of IP addresses. Each IP has a reverse DNS entry, usually set by the ISP. For residential internet services, users typically cannot modify these settings due to security concerns and the complexities associated with dynamic IPs. In contrast, business internet services often allow customization of reverse DNS entries. This ability is crucial to maintain a trustworthy digital identity, particularly for static IP addresses used in professional contexts and proper reverse DNS configuration is essential, especially for email servers, to prevent emails from being marked as spam.
Domains with unset or wrong DMARC
DMARC stands for Domain-based Message Authentication, Reporting & Conformance is an email authentication protocol designed to give email domain owners the ability to protect their domain from unauthorized use, commonly known as email spoofing. The core function of DMARC is to help email receivers determine what to do with messages that fail to authenticate against existing SPF (Sender Policy Framework) and DKIM (DomainKeys Identified Mail) standards. The information for SPF and DKIM protocols, which together are used in DMARC, are delivered through DNS records. Thankfully Mailcow mages almost all this security part by providing DNS record values that you just have to copy in your DNS configuration.
As said, Mailcow handles DMARC configuration so the issues are boiled down to just have the correct reverse DNS set up on your email server. Unfortunately, as said before, reverse DNS is almost impossible to set up on residential lines. We could install our server on a VPS, but that's not the aim of this post, the goal is to host you own server at home, in order to have as much control as possible on what is really exposed on the internet.
My solution here is the following: use a vps with a fixed public ip address and editable reverse DNS as a internet gateway for the mail.
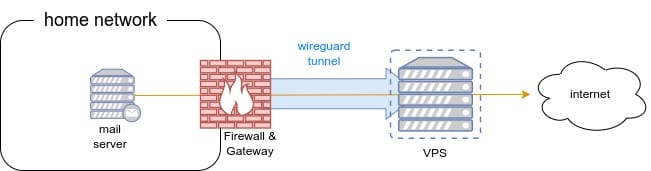
To achieve this, I installed wireguard on the VPS, enabling ip forwading, then I set up some firewall rules to make the VPS wireguard IP as the gateway for the mail server and was able send emails. At last, to allow incoming messages, I set up socat to forward incoming connections to the vps straight through the firewall to the mail server, and that's it!
I've used this mail server for the past ~6 months and never got a reject nor being marked as spam,
Nevertheless, I still feel this is an incomplete setup and, even if using this server more and more, I don't think it is ready enough to get rid of an external mailbox.